One of the problems we faced when we started using Kubernetes for our rails application was defining the optimum resource limits for the pods. We tried logging into our production servers and running top to see the usages during peak times to get an idea of the resource limits that we could set. Despite having set the average resource usage from what we observed in top or based on what platform like AWS or Heroku monitoring we still end up experiencing CPU throttles and spikes in the usage due to different traffic loads and utilization patterns on our K8s infrastructure which made us tweak the limits over and over again. As you can tell tweaking the numbers is not so DevOps friendly way of doing it. And then we found out about Vertical Pod Autoscaler.
What is Vertical Pod Autoscaler(VPA)?
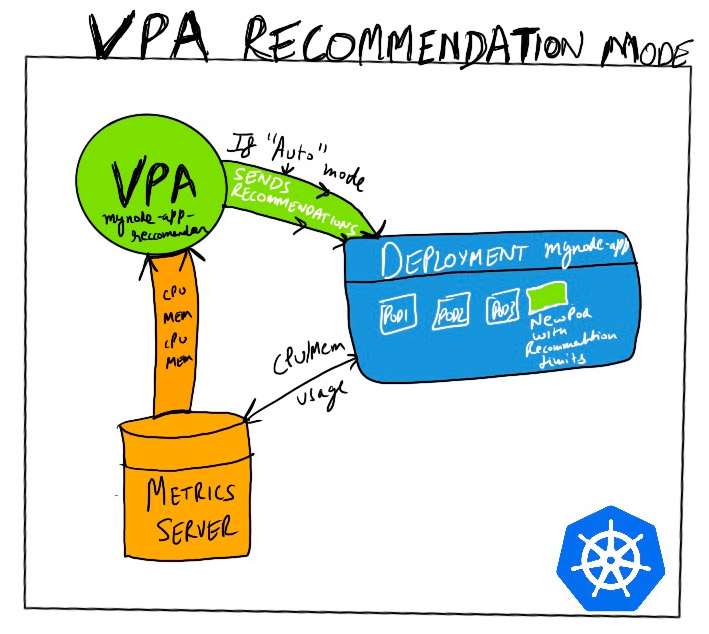
The Vertical Pod Autoscaler in kubernetes was developed keeping in mind the problem of finding the right values for resource usage of our pods. It takes over the job of fixing the pod resource limits because it looks at the pod resource usage data and then can either recommend the values or automatically update them. Keep in mind that when its set to automatically update the values it will be evicting the pods when load and usage values fluctuate.
How VPA works?
VPA works in conjunction with metrics server so make sure metrics server is setup before setting up VPA in your cluster. When VPA is setup on a cluster, it launches 3 deployments :

- VPA admission hook: It checks every pod that is setup on cluster to see if its connected to VPA.
- VPA recommender: This component connects talks to metrics-server and gets the past and current CPU Memory usage data based on which it predicts the optimum values that can be applied.
- VPA updater: This components takes those calculated values in recommendation range and applies them to the pods by carefully evicting them and then restart the pod.
Some limitations
Before you end up try to use it here are some limitations:
- Cannot be used in conjunction with HPA which relies on CPU and memory coming from metrics data in K8s.
- As VPA does replacements of pods when used in Auto mode it requires atleast 2 healthy pods running at a time.
- Needs minimum memory to be set to 250Mi. So apps using less that 250Mi may end up consuming more resources.
- It only works with Deployments, Statefulsets, Daemonsets, Replicasets and cannot be used with single pods.
How to use it?
Setting up metrics-server
metrics-server github page is pretty self-explanatory as it gives on kubectl apply command to get metrics running. But if you are using kind cluster locally then currently you might end up getting some errors after installing the metrics-server we need to patch it to make it work https://github.com/kubernetes-sigs/kind/issues/398:
kubectl apply -f https://github.com/kubernetes-sigs/metrics-server/releases/download/v0.3.6/components.yaml
kubectl patch deployment metrics-server -n kube-system -p '{"spec":{"template":{"spec":{"containers":[{"name":"metrics-server","args":["--cert-dir=/tmp", "--secure-port=4443", "--kubelet-insecure-tls","--kubelet-preferred-address-types=InternalIP"]}]}}}}'
The patch to the deployment includes the following arguments "--secure-port=4443", "--kubelet-insecure-tls","--kubelet-preferred-address-types=InternalIP" that fixes the metric-server deployment on Kind.
Or can simple install it using Helm with:
helm install ms stable/metrics-server -n kube-system --set=args={--kubelet-insecure-tls}
Setting up Vertical Pod Autoscaler
At present Vertical pod autoscaler needs to be enabled by installing it separately by cloning the Autoscaler repo and from inside the repo directory running:
./hack/vpa-up.sh
If you end up getting openssl error then consider updating the openssl, for mac users with brew installation its easy as brew upgrade openssl or if upgrade doesn’t fix the issue then checkout the vpa-release-0.8 branch for autoscaler repo and run the command installation again.
Now after the installation is successful we can now setup VPA that will connect to our deployment for the nodejs app. Github repo for the deployed app: https://github.com/matharoo/mynode-app.
vpa.yaml
In this tutorial we are setting up VPA in recommendation mode:
The main components of the file definition for vpa are:
spec.targetRef.name: which points to our deployment name.updatePolicy.updateMode- When this set tooff, it only gives us recommendations which we can check by runningkubectl describe vpa mynode-app-vpa-recommender -n nodejs. But when its set toAutoit automatically updates the pods by evicting and restarting them, so be careful when setting it to this mode even though it does make sure that we have atleast 2 healthy running pods in the deployment.
deploying VPA
kubectl apply -f vpa.yaml -n nodejs
Give it a few minutes to make sure its able to get some usage data and give you the recommendation limits based on the data it fetched from metrics-server for our deployment pods.
Result
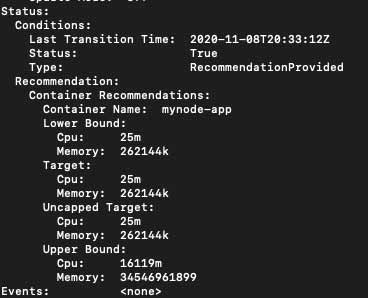
To view the recommendation result we can simply run:
kubectl describe vpa mynode-app-vpa-recommender -n nodejs