By default when we create reactjs application it comes bundled with Jest to help test react components. To quickly setup just create a folder __tests__ in src/. Then we can create tests file with naming conventions like App.test.js i.e. <component-name>.test.js.
Running the tests
Just run the following command to run all the tests specified in __tests__ directory:
npm testThen the test will give out the summary if they passed or failed.
Snapshot Testing
In this type of testing a snapshot of UI rendered code is taken and stored in __snapshots__. When the test runs it compares component code changes with snapshot if they differ the test fails. This type of testing is best suited for components whose state does not change and are static.
Required packages : yarn add --dev react-test-renderer that allows us to create snapshots of the components.
Lets write a test for a button component and check if it renders properly with snapshots.
Our component - Button.jsx:
1
2
3
4
5
6
7
8
9
import React from 'react';

function Button(props) {
  return (
    <button className="btn-test" onClick={props.toggle} >{props.label}</button>
  );
}

export default Button;
Our test file in __tests__ directory: Button.test.js
1
2
3
4
5
6
7
8
9
10
import React from 'react';
import renderer from 'react-test-renderer';
import Button from '../components/Button';

it('renders Button component', () => {
    const component = renderer.create(
        <Button label="Click Me"/>,
    ).toJSON();
    expect(component).toMatchSnapshot();
})
Now when the test runs we create our Button component with renderer.create() method and then pass component to expect method where we compare the snapshot with last saved snapshot. When we run it for the first time it creates a __snapshots__ directory in our __tests__ and saves Button.test.js.snap. When the test is run the second it will compare new snapshot with the saved and our test will pass if the component is same.
DOM based testing
This type of testing is more closer to how a real world user interacts with the app as we fire DOM events in our test and try to interact with the UI. We will write a test for our App.js file where will fire a button click event and test if message Hello World appears.
Required packages : react-dom/test-utils to allow us to use act() API, covered below.
Our Test:
App renders in div container -> Button component is loaded ->
Button component verified by checking the textContent==='Click Me!' ->
Simulate a button click event ->
Check if message 'Hello World' appears
Our component - App.js
1
2
3
4
5
6
7
8
9
10
11
12
13
14
15
16
17
18
19
20
21
22
23
24
25
26
import React, { useEffect, useState } from 'react';
import logo from './logo.svg';
import './App.css';
import Button from './components/Button'

const App = () => {
  const [showmsg,setShowmsg] = useState(false)
  const toggle =(e)=>{
    if(showmsg) setShowmsg(false)
    else setShowmsg(true)
  }
  return (
    <div className="App">
      <header className="App-header">
        <img src={logo} className="App-logo" alt="logo" />
        {showmsg ? <div className="msg">Hello World!</div> : null}
        <p>
        <Button label="test" toggle={toggle}/>
        </p>
          <p>Learn React</p>
      </header>
    </div>
  );
}

export default App;
Our test file in __tests__ directory: App.test.js
1
2
3
4
5
6
7
8
9
10
11
12
13
14
15
16
17
18
19
20
21
22
23
24
25
26
27
28
29
30
import React from 'react';
import ReactDOM from 'react-dom';
import App from '../App';
import { act } from "react-dom/test-utils";

let container;

beforeEach(() => {
  container = document.createElement('div');
  document.body.appendChild(container);
});

afterEach(() => {
  document.body.removeChild(container);
  container = null;
});

it('App render and button click without crashing', () => {
  act(() => {
    ReactDOM.render(<App />, container);
  })
  const button = container.querySelector(".btn-test");
  expect(button.textContent).toBe("Click Me!");
  act(() => {
    button.dispatchEvent(new MouseEvent("click", { bubbles: true }));
  });
  const msg = container.querySelector('.msg');
  expect(msg.textContent).toBe("Hello World!");

});
Lets understand how the test works:
- We are using
act()API which is available throughreact-dom/test-utilswhich is imported at the top. This allows us to to play with ReactDOM, thus giving us the ability to manipulate DOM just like we are interacting with the app on a browser - Then from line number 8 through 16 we create a container div which will be rendering our App and Button component. We also make sure the element is unmounted after ou test is done as specified in
afterEach(). - Then comes our test
App render and button click without crashing. We wrap theReactDOM.render(<App />),containerwithact()which is our first step that mounts the component on to the DOM. - Now since the App is mounted we can manipulate the DOM by using methods like querySelector(), getElementsByTagName, getElementsByTagName, getElementsByClassName, etc. I am using querySelector(‘.btn-test’) where
.btn-testhelps us get the button by its class name and on line number 23 we verify if we got the right button by using expect. - Now in line 24-26 we fire our button click event using dispatchEvent on our target button with event bubbling which is default way of JS to handle events going from innermost to outermost element.
- After our click is fired we need to verify if the msg div appears and have the text ‘Hello World’ as shown in line 27-28.

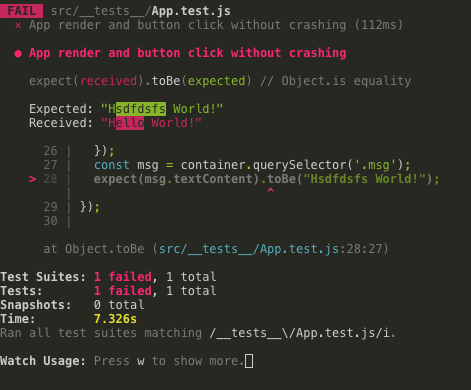
To verify if the tests are not just always passing try changing the expect textContent to something like 'Hsdfdsfs World' on line 28 and when you run npm test we see a message saying what was rendered and what was expected.

So that was a very basic test setup to show how we can use inbuilt testing tools like jest for DOM rendering tests which emulates end to end testing or how a user will be interacting with UI.
In order to test if the functions like toggle inside our components are behaving properly by changing showmsg or any other internal functionality of app which is generally abstracted from users perspective we use Functional testing which I will try to cover in the coming weeks.
You can check the github repo here that covers all the code we cover in this post.