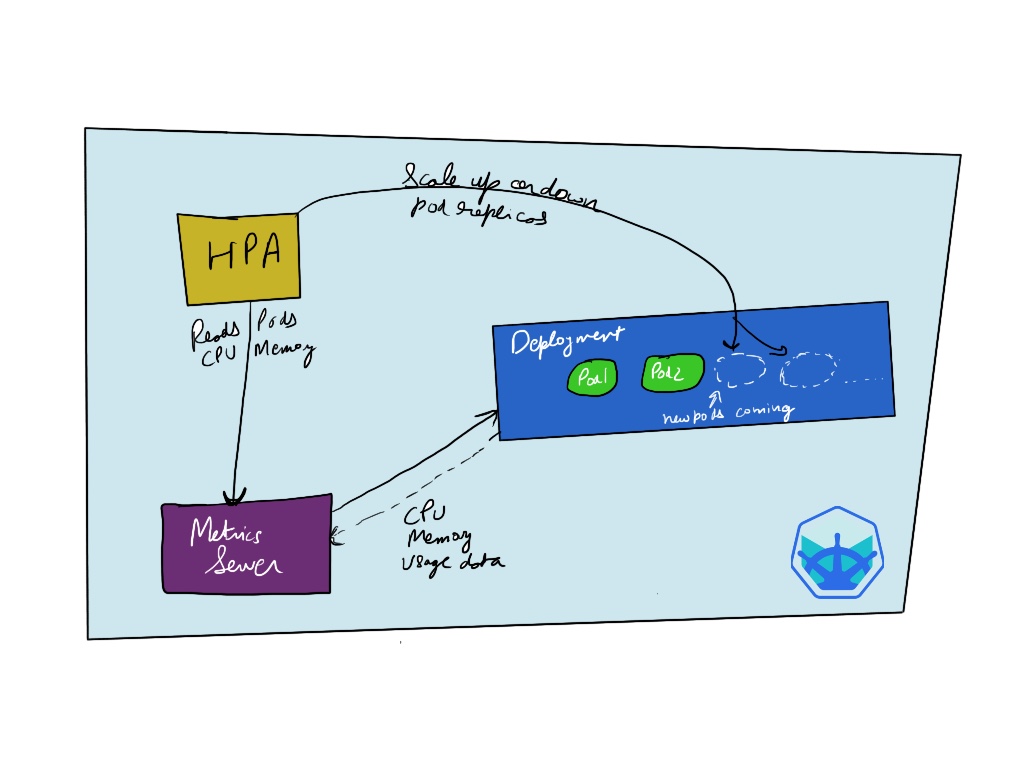
Autoscaling is one of the great features of kubernetes allowing us to automatically horizontally scale nodes or pods depending on the demand or load on our web application, it even allows us to do vertical autoscaling in case of pods. There are 3 types of autoscaling that are available with Kubernetes resources:
- Horizontal Pod Autoscaler
- Vertical Pod Autoscaler
- Cluster Autoscaler
In this tutorial we cover how to setup Horizontal Pod Autoscaling.
What is Horizontal Pod Autoscaler(HPA)?
As the name suggest it allows us to automatically scale up or down the number of pod replicas. When we define our deployment.yaml we set the number of number replicas like:
metadata:
  name: mynode-app
  namespace: nodejs
spec:
  replicas: 2
With the HPA resource defined we can tune up the number of replicas up and down depending on CPU usage or memory usage.
hpa.yaml
The main components of the file definition for hpa are:
scaleTargetRef.name: which points to our deployment name.minReplicas- minimum number of replicas running at all time.maxReplicas- maximum number of replicas that HPA can scale up to. It sets the upper limit and pods cannot be scaled up more thanmaxReplicasnumber.targetCPUUtilizationPercentage- this is the threshold of CPU resource usage on the pod. When the threshold is hit the HPA adds a new pod. We have set it scale if CPU usage crosses 50%.targetCPUUtilizationPercentage- this is a similar threshold but for memory utilization.
How HPA works?
For hpa to work it needs to have access to metrics like CPU and memory usage of our kubernetes pod component. The metrics are supplied through metrics server which pulls the usage out of the pods. HPA can then query metrics server with the latest usage information about CPU and memory and then scale up according to the values set in our hpa.yaml.
Tutorial
Components involved:
- metrics-server
- minikube / kind cluster
- a k8s deployable app (follow my previous tutorial)
Github repo for the deployed app: https://github.com/matharoo/mynode-app.
Installing metrics-server
First we need to install metrics server that will query the pod for CPU and Memory usage. On minikube it can be done by :
minikube addons enable metrics-server
or for other clusters it can be installed with a kubectl deployment command.
This installs a metrics-server inside the kube-system namespace and can be checked via:
kubectl get pods -n kube-system | grep metrics-server
Output:
metrics-server-d9b576748-rr6vb              1/1     Running     2          4h5m
Setting up HPA
Lets quickly install hpa by just running:
kubectl apply -f hpa.yaml -n nodejs
This will setup the HPA resource in our nodejs namespace to track our mynode-app deployment and to check if its setup just run:
kubectl get hpa -n nodejs
output:
NAME             REFERENCE               TARGETS         MINPODS   MAXPODS   REPLICAS   AGE
mynode-app-hpa   Deployment/mynode-app   <unknown>/50%   2         5         0          13s
Testing HPA
To test if HPA actually scales the pods, lets try to put some load on our application. In the deployment.yaml i have also setup some default resource limits on our pods like :
apiVersion: apps/v1
kind: Deployment
metadata:
  name: mynode-app
  namespace: nodejs
spec:
....
.......
resources:
  requests:
    memory: "64Mi"
    cpu: "150m"
  limits:
    memory: "128Mi"
    cpu: "350m"
.......
...
I have added a /compute to the demo nodejs application with some non-blocking nodejs code so that we can call the endpoint multiple times and it ends up simulating a more realistic load situation by doing a heavy calculation.
Simulating load on the deployment pods
To send some load to the application i used hey tool like:
hey -c 2 -n 1 -z 5m http://mynodeapp.com/compute
This makes multiple calls to the compute endpoint for 5 minutes using two separate threads.

Result
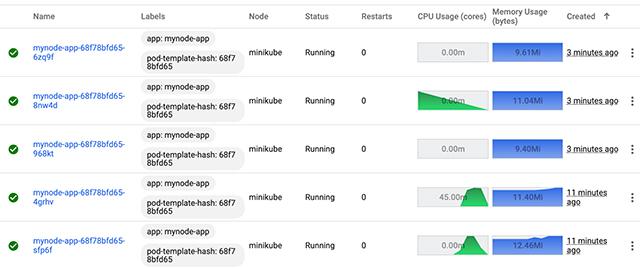
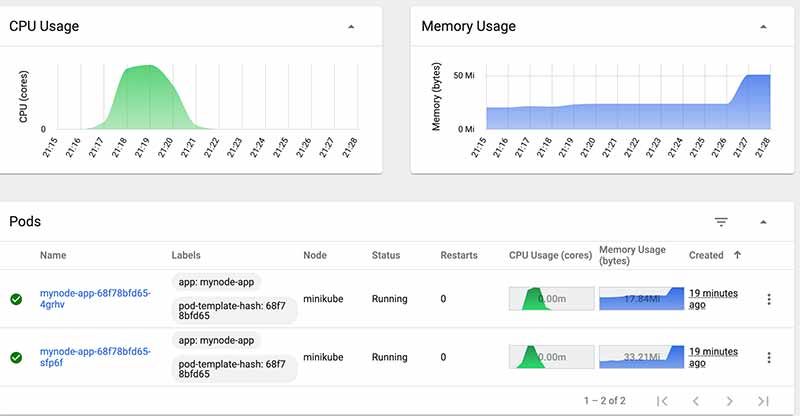
After we are able to sustain the load for some time the HPA comes into action and increases the pod replica count to our specified number until the load gets back to normal and then brings it down to minimum number.

Once the CPU load flattens down to normal the extra new pods are removed.
