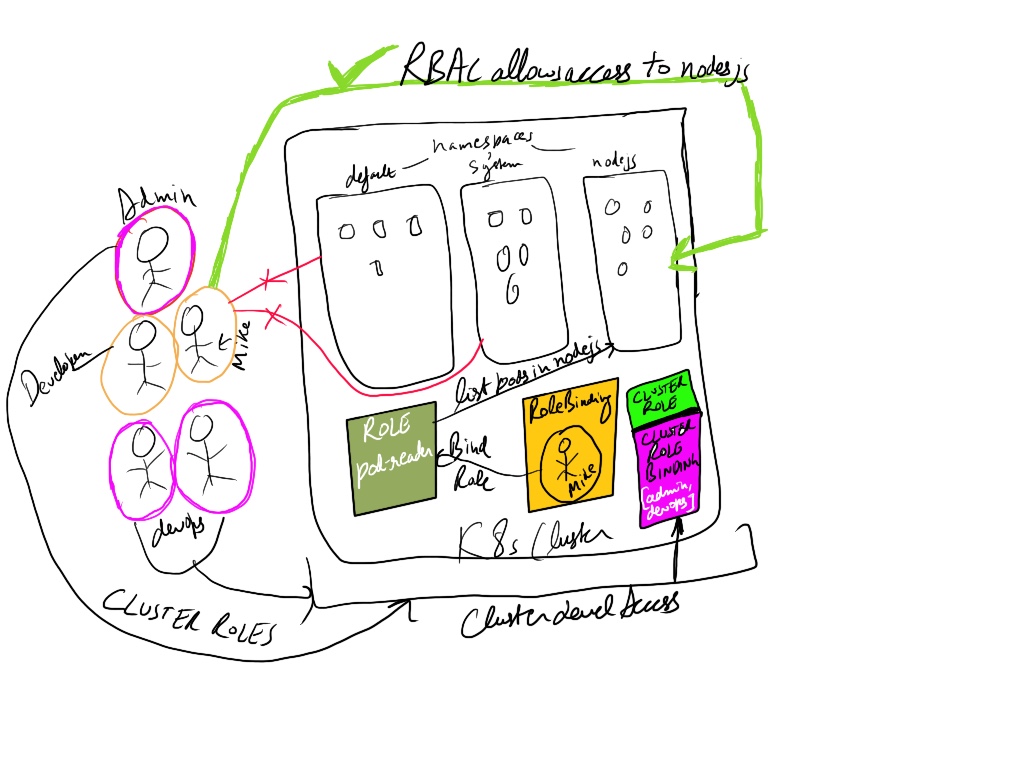
When communicating with a kubernetes cluster we use kubectl command line tool which actually sends in requests to the kube-api-server on the master node to execute any command like creation or deletion of pods, services, namespaces or any kind of kubernetes resources. Kubernetes RBAC gives a number of ways to authenticate and create users which ranges from HTTP basic auth file, to Cerficates as explained in here, to using specific . Another thing to note is not only provides a to authenticate for users but for groups and applications. as well. For example prometheus needs to read K8s resources, so we create service account and bind to the pods, that service account then goes as part of role along with user or groups.
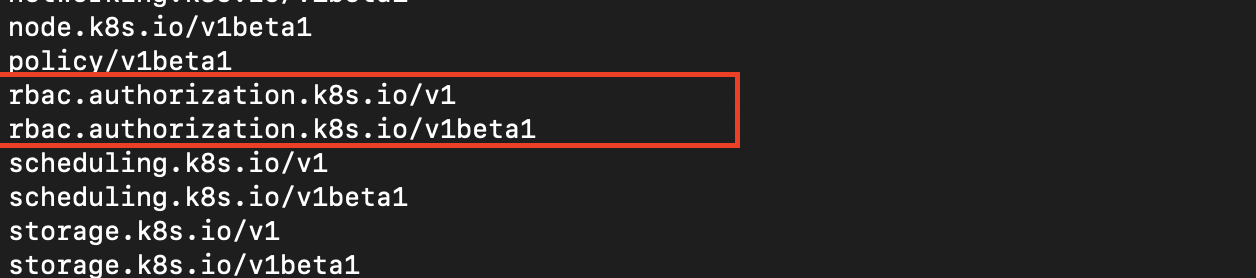
Any user using the kubectl command must authenticate with API server. Some of the authentication methods include certificate authentication which must be signed with same CA as of Kubernetes server itself for it to actually be able to trust anf accept any of those API call requests. Before we jump into the tutorial quickly verify that rbac is enabled on your K8s by running
kubectl api-versions
Here is a quick tutorial for adding a user based on certificate authentication and allowing it to see the pods running in our nodejs namespace, follow the last tutorial to see how we deployed the node app.
Components involved:
- openssl (for cert generation)
- Minikube / kind / kops
- Role and RoleBinding K8s resources
Creating the certificates
We use the openssl to create user key and certificate sign request that will be needed to generate the certificate. For example lets try to setup a user named mike with ability to only to list pods.
Generating key file
openssl genrsa -out mike.key 2048
This generates a private key mike.key file which we later use in the next command along with -subj specifying the Common Name as user-name and Organization name as a group that user will belong to i.e. developer.
openssl req -new -key mike.key -out mike.csr -subj "/CN=mike/O=developer"
Now create the certificate(mike.crt) for user we use the minikubes CA.crt and CA.key so that user the is trusted by our minikube cluster.
openssl x509 -req -in mike.csr -CA ~/.minikube/ca.crt -CAkey ~/.minikube/ca.key -CAcreateserial -out mike.crt -days 365
With kind cluster
If using kind-cluster then you have to copy the certificates from the container of the master control plane node by running
docker container list
docker cp <containerId>:/etc/kubernetes/pki/ca.key kind/
docker cp <containerId>:/etc/kubernetes/pki/ca.crt kind/
Now sign with:
openssl x509 -req -in mike.csr -CA kind/ca.crt -CAkey kind/ca.key -CAcreateserial -out mike.crt -days 365
With KOPS
to do that for cluster created with kops we download the certificates from S3 bucket with:
aws s3 cp s3://$BUCKET/$CLUSTER/pki/private/ca/$KEY.key ca.key
aws s3 cp s3://$BUCKET/$CLUSTER/pki/issued/ca/$CERT.crt ca.crt
Then run the same openssl command as above to create a certificate(.crt) for your user.
Generating the user
Now since we have generated the certificate we can now create the user and set our kube config file to use the user and set the context.
First lets add the user entry in kubeconfig with
kubectl config set-credentials mike --client-certificate=mike.crt --client-key=mike.key
Now we set the user context:
kubectl config set-context mike-context --cluster=minikube --user=mike
To check if the user was added we can do kubectl config view and see if the user is added to the file.
Lets test the user real quick by switching to the user context:
kubectl config use-context mike-context
Now lets try to list our pods in namespace nodejs.It should fail.

Giving access to resources to user with Role and RoleBinding
Creating a Role
We have roles for defining what type of access to what resources is given to a user. We use Role if we are trying to create role for specific namespace. We have ClusterRole resource if we are trying to give a cluster level access to an admin. Lets quickly setup a Role.
Resources are defined in role via apigroups for example deployment is part of apps. Then actions are defined with verbs which include list, create, delete,etc.
Creating a RoleBinding
This resource helps us bind the user to a role, or groups or applications. For a role the resource is called RoleBinding and for ClusterRole its ClusterRoleBinding as expected.
Now after we apply RoleBinding, now we should be able to access the role with new workspace.
