In kubernetes we have cert-manager tool to easily setup tls certificates for our domains and enabling the https. Gone are the days when we had to generate the certs using openssl and upload them to ssl provider and the overall complex process, cert-manager simplifies the process of setup and even renewals. Cert manager can easily setup the LetsEncrypt certifcates and even handle the renewal after 90 days. In this tutorial we setup the self-signed certificate which are great for local development and testing.
Components involved:
- Minikube for the local cluster
- cert-manager
- Resources - Issuer, Certificate, secrets
If you followed the last tutorial where we setup the nodejs app running on mynodeapp.com locally, we will try to setup and enable the https on it with cert-manager in this tutorial.
Setting up cert-manager
To install it on your local minikube cluster, I used helm to install it via chart provided by cert-manager itself:
kubectl create namespace cert-manager
helm repo add jetstack https://charts.jetstack.io
helm repo update

helm install \
  cert-manager jetstack/cert-manager \
  --namespace cert-manager \
  --version v1.0.3 \
  --set installCRDs=true
In these commands above we created a namespace cert-manager, then add helm repo, did an update and then installed the cert-manager with helm install ... inside its namespace. Now check the pods inside the namespace to see if the installation worked, there should be 3 pods running.
kubectl get pods -n cert-manager
Output:
NAME                                      READY   STATUS    RESTARTS   AGE
cert-manager-556549df9-qxp7k              1/1     Running   0          138m
cert-manager-cainjector-69d7cb5d4-vdktp   1/1     Running   0          138m
cert-manager-webhook-c5bdf945c-xcn2r      1/1     Running   0          138m
Generating the certificate
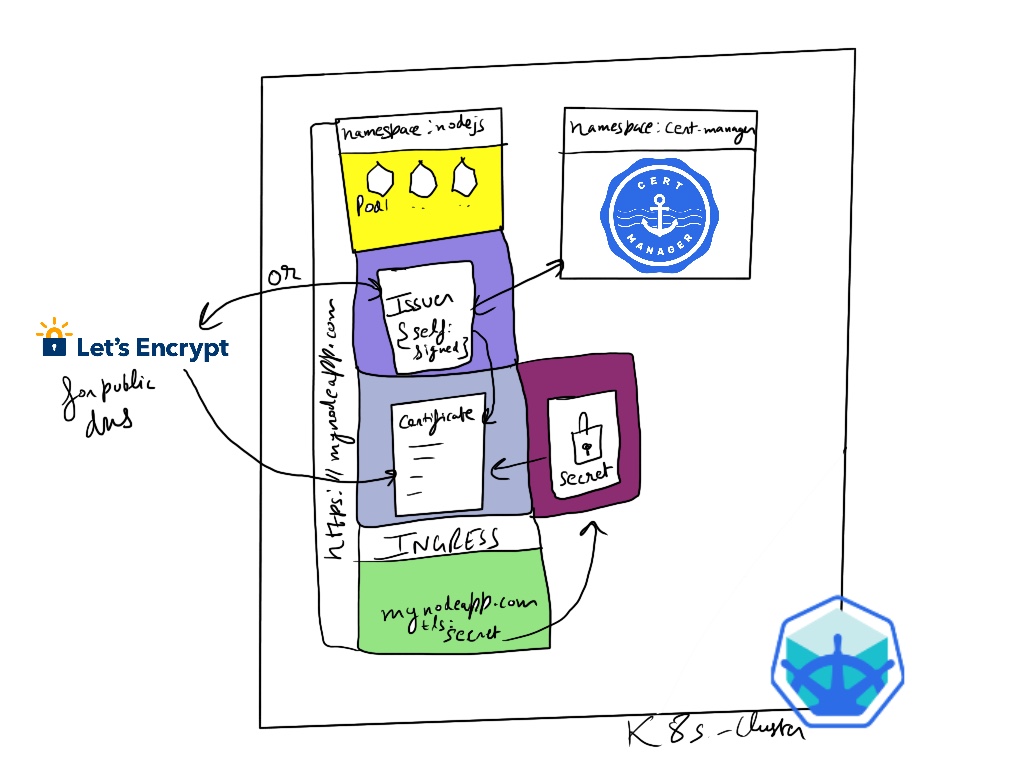
In order to get the cert-manager to generate the certificate for us, we need to install the 3 resources:
- Issuer
- Certificate
- Ingress (with reference to certificate secret)
issuer.yaml
The issuer resource is responsible for generating the certifcate, since we are generating ourselves so its self signed. But if it was LetsEncrypt then it would look something like this:
After applying the resource with kubectl apply -f issuer.yaml -n nodejs
kubectl get issuer -n nodejs
Output:
NAME         READY   AGE
selfsigned   True    11m
So our self-signed issuer was setup successfuly, now we can go ahead and apply the certificate and updated ingress.
Using LetsEncrpyt
For getting the certificate for a real world domain there are two ways to solve the challenge HTTP-01 and DNS-01. In HTTP-01, there is server deployed on our dns in K8s where the certificate verification is sent by LetsEncrypt to validate and verification the owner of the domain, it looks something like this: http://
The other method DNS-01 is a little complex in which a TXT record is added by api access to our dns records for our domain, then the acme server of LetsEncrypt verifies the record and provides us with the certificate. The example issuer for DNS-01 type for AWS Route53 looks like this:
certificate.yaml
Now here is the certificate resource where we can specify certificate duration, renewal,etc. We also specify the secretName which is where the certificate key is stored. This secretName is then also referenced in our ingress to invoke the certificate generation. Inside our certificate resource we refer to the issuer resource that we setup above like issuer: selfsigned which will be generating the certificate request and get us the https certificate.
After applying the resource with kubectl apply -f certificate.yaml -n nodejs
kubectl get certificate -n nodejs
Output:
NAME             READY   SECRET       AGE
selfsigned-crt   True    tls-secret   10m
So we verified our self-signed certificate resource has been setup that will be using tls-secret to store the certificate keys with encoded information about our dns.
mynode-ingress-tls.yaml
In the ingress that we setup in last post to get the domain pointing to our service, now above rules we specify tls setting like:
tls:
    - hosts:
      - "mynodeapp.com"
      secretName: tls-secret
After applying the resource with kubectl apply -f mynode-ingress-tls.yaml -n nodejs
kubectl get ingress -n nodejs
Output:
NAME             CLASS    HOSTS           ADDRESS        PORTS     AGE
mynode-ingress   <none>   mynodeapp.com   192.168.64.7   80, 443   3m14s
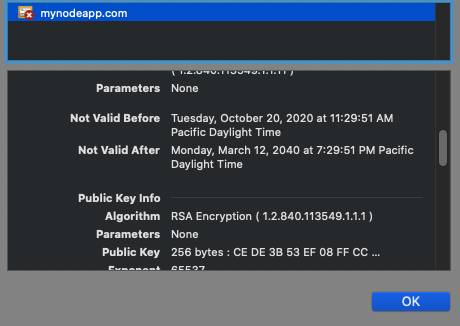
Once we have the IP on our new ingress, there will be 443 port also added showing the certificate has been issued for the domain. This can be verified with desribe command like:
kubectl describe certificate selfsigned-crt -n nodejs

Testing on browser
Within few seconds our self-signed certificate should be generated and we should be able to use https on our mynodeapp.com. On google chrome it gives error due to not having a valid third pary verifying our certificate, so we can either import the certificate or allow insecure hosts. Refer to https://stackoverflow.com/questions/7580508/getting-chrome-to-accept-self-signed-localhost-certificate